By Mark Hall, Guest Blogger.
An e-commerce and Customer Research Expert who has consulted for over 20 years with a wide range of clients including AT&T, American Express, Edmunds, SpyTec and the California Lottery. When not working, Mark enjoys playing saxophone, mountain biking and reading biographies.
As any seasoned professional knows – whether a carpenter or a digital creative – your daily work is part procedural and part art. In this article I focus on the ‘art part’ of user testing; I offer seven tips for creating user test prototypes that will give you the feedback you need while keeping you on time and budget.
Tip 1: Stick to your user experience test focus and objectives
All too often over the years I’ve seen prototypes that are bloated and unfocused. As you plan the objectives and scope of your user test, your first question should always be, ‘What am I most seeking to assess?’ If you’re redesigning a content-rich site, your users will need to clearly understand where they are as they do their tasks; contextual clarity will be key. So you’ll need a broad-oriented test to assess navigation structure and sectional page layouts. On the other hand, if you’re testing a learning application or an e-commerce checkout flow, you’ll most want to assess task completion, and expose interaction-level issues. For this, you should design a conversion or workflow-oriented usability test.

Clearly your test scenario, tasks and questions all need to connect to your test objectives. So be crystal clear on those first. If you try to gather every possible type of UX feedback in a single test, bad things will happen, such as: your prototype will grow awkward in size and scope, your list of tasks will get long, and your sessions will run too long.
User test guru Jakob Nielsen’s mantra, ‘test early and often,’ is as applicable today as it was fifteen years ago. So if you’re not already running tests with 10 or fewer users, and doing multiple rounds, you should start doing so now, so that your prototype designs can ‘fail fast,’ allowing your production designs to thrive.
Tip 2: Make sure your prototype is the right size
At the risk of sounding ‘duh’ obvious, I first want to emphasize that you need to test the actual user experience ‘real estate’ that’s most pertinent to your website visitors. If 60% of your traffic is from smartphones users, and growing every week, you shouldn’t test a desktop-sized prototype. Similarly, if you’re creative team is designing an application that will only be used on laptops or larger devices, you should user test your design on a laptop viewport (screen resolutions), and make sure the UI elements remain intuitive as the screen size expands.
In some cases you may need to test with multiple viewport sizes: most typical smartphone (iPhone 7 or Samsung S6), a tablet (iPad or equivalent), or on a desktop. Only by getting this cross-device feedback will you know if the design is on track as future users move through the entire online journey.
Find your most common screen sizes by checking your Google Analytics account in the ‘Audiences > Devices’ section. Also be sure to adjust your prototype interactions based on the user experience guidelines published for each primary device you’re design is targeting. You can find these on each brand’s websites (e.g. search for ‘iOS user experience guidelines’ or ‘Android user experience guidelines).
Tip 3: Go ahead, ‘rough up’ your prototype!
If you’re both a research analyst and a designer, I know you want your prototype to be a thing of beauty – to show off its perfect, Photoshopped face to the world. But often a high fidelity design isn’t the way to go when your design is in the evaluation phase. No, it’s better to keep the design medium fidelity at most, or even a little ‘sketchy’. In fact, the wireframing and prototyping tool Balsamiq has an option called ‘sketch’ for the Skin setting. Clicking this option gives your page borders and internal panels borders a hand-drawn look. Best of all, you’ll likely find (as I have) that the rougher edges encourage your users to be more open and honest with their comments.
Here’s the only time I can think of when it doesn’t make sense to make your wireframes sketchy: when you’re user testing a branded sales experience or a high-end consumer application. In these cases it’s important to get users’ perceptions of your visual design, and how details like the typography, line weights and gradients affect their trust in the brand and user experience. So in these cases higher-fidelity visual composites make sense.
Another thing to remember: 90% of the time your prototype is ‘throw away’ code. None of the HTML used in your prototype (unless it’s for the actual site or application on your development server) will end up in the production environment. So focus your time in the ‘visual editor’ mode, where you don’t have to worry about writing well-formed HTML code.
Tip 4: Use clickable image maps for low-interaction sites
You don’t always have to create a fully interactive prototype from scratch. Instead, for many early-design-phase tests, it’s most expedient to just ‘hook together’ some screen images to simulate the behavior of an interactive prototype. This is what I call the ‘clickable image map’ method.
Here’s how to do it:
- Choose the screen sequence you want to test based on your test objectives.
- Create rough wireframes or visual composites, whichever is appropriate.
- Save off GIFs of your wireframes, or PNGs of your visual composites (after flattening the layers in your visual design tool).
- Upload the images to a rapid prototyping tool like HotGloo, InvisionApp or Balsamiq
- Add ‘hotspot’ links to the key links, buttons and calls-to-action
- Save the prototype in HTML format
In most cases you’ll have a fully working prototype in 2 hours or less!
True, this method doesn’t work in cases when you need to include the detailed interactions of a depth-oriented workflow. Or if you’re working with users with little imagination, who get confused when nothing happens when they click in ‘dead’ areas (you can reduce this potential confusion, of course, by explaining this limitation during your test introduction). So use this method only for early-design-phase UX tests.
Tip 5: Test your visual designs separately

When seeking feedback on visual treatments, with the exception of highly branded sales experiences, you should test grayscale wireframes separately from your visual designs.
It may sound ‘old school’ to separate aesthetics from function, but I’ve found that doing so is very beneficial since:
- Visual designs predominate humans’ initial perceptions – and impressions – of products and services. So asking for both usability and subjective satisfaction feedback at the same time can give you ‘clouded’ impressions of the experience.
- Visual design work requires specialized resources (Photoshop experts), who tend to have higher production demands on them than user experience analysts. You can avoid having to wait a week or two for visual composites by decoupling the ‘visual skin’ from the wireframes you’re user testing.
That said, here’s how I recommend collecting visual design feedback during a test. First, complete the task-based portion of the test. Then, after following up on usability issues, toss two or three visual composites in front of the user. Ask the user which one he prefers, and why. Granted, these comments are highly subjective, but after 5 or so participants you’ll get a good sense of which design is most appealing and suitable for the site or application you’re creating.
Tip 6: In your test script, ask users to share their feelings
As Don Norman says in his book, Emotional Design, designs appeal to users on three levels: visceral (‘gut’ reactions), behavioral (interaction intuitiveness) and reflective (looking back). All designs should provide a strong behavioral experience – that’s usability, the ‘can do’ part. For most designs, though, you should also capture feedback on the visceral level during testing – to gauge the motivational, or ‘will do’ part the design. (Reflective reactions are harder to gauge during user tests since they happen at a later time, and are influenced by users’ broader experiences.)

To get affect, or emotional, feedback, first focus on establishing a good rapport with your test participants. During the test introduction, clearly communicate that this is a place where it’s safe to share feelings. Think of the most attentive, caring conversationalist you know and you’ll be on the right track.
Another great way to collect affect data: create a sheet that shows a wide range of facial expressions, characterizing the top 30 or so human emotions. During the test, tell the participant to circle the emoticon that captures their feeling at that point in time. And insert this step in various key points in the test script. There you have it: a quick, easy participant ‘feelings’ timeline.
Tip 7: Use a best-practice usability testing and analysis platform
Ever tried to complete a do-it-yourself job with second-rate tools? If you have, you know it can be very frustrating. As a user experience professional, you don’t want to go there when you’re reputation and other people’s time is on the line. Before it’s crunch time is when you’ll want to research and choose a capable test administration and analysis platform.
Consider your analysis requirements. Most likely you’ll want a tool that:
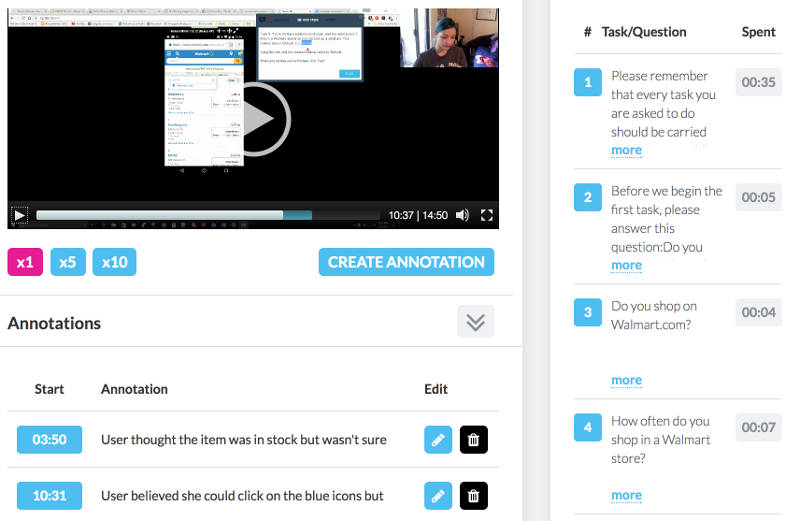
Records participants faces, audio and screen in a picture-in-picture format
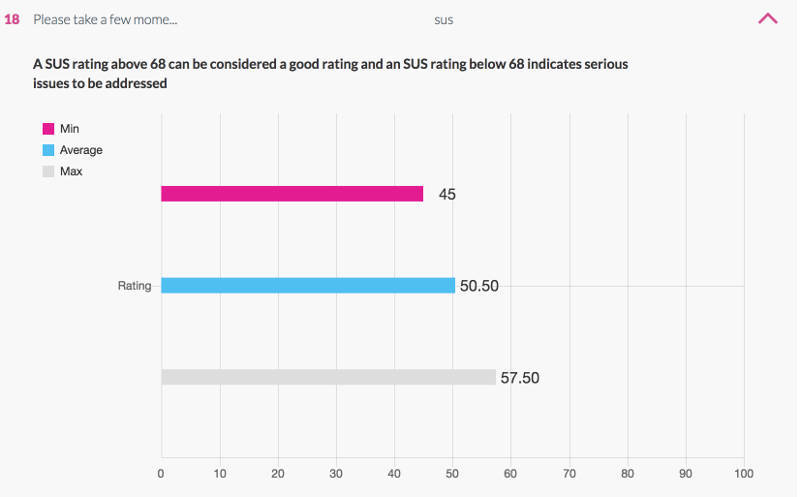
Extracts quantitative data such as time on task, success/failure rates, and system usability scale (SUS)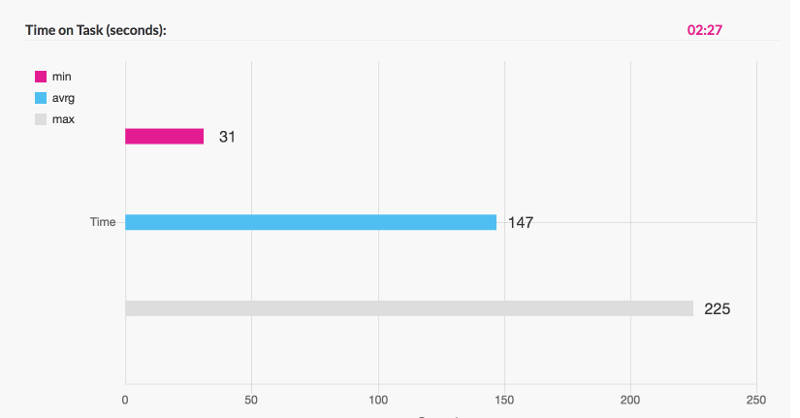
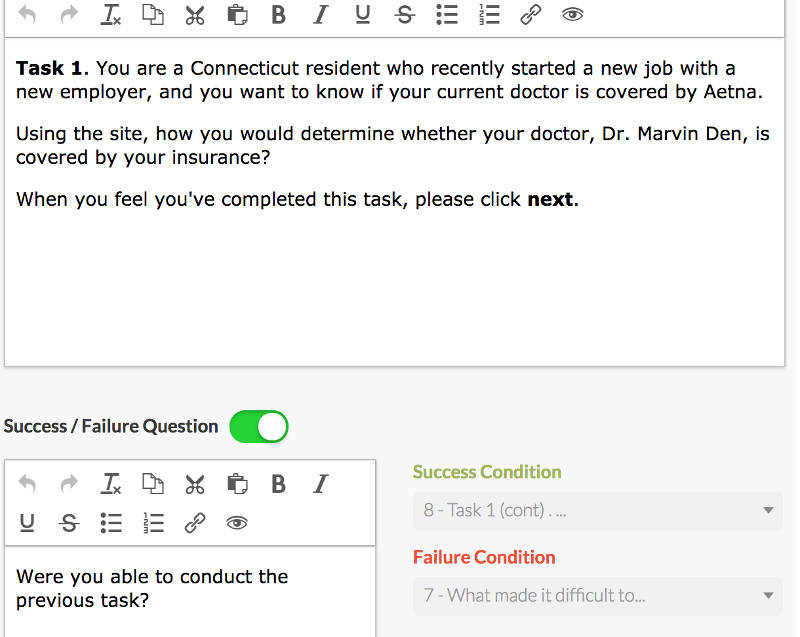
Supports branching logic in unmoderated testing and can also support moderated testing
Can recruit participants with either standard or custom demographic criteria
Allows you to easily annotate & share key events and comments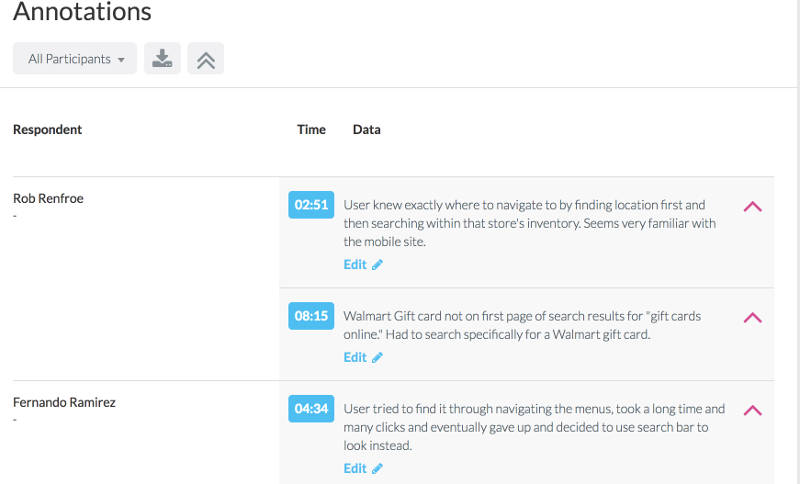
Allows you to serve up questions and surveys at any point in the test script
Whichever tool you choose, you should be able to obtain real participant qualitative and quantitative feedback within a day, even hours. So you can focus more of your time analyzing the top issues, affect and user’s clever suggestions, and sharing these results with your team.
Summing Up
Creating a user testing prototype is part logical and part creative. But it’s also 100% practical: you need to gather both metrics-based and subjective user feedback from users while staying focused on your main user research objectives. If you get carried away creating a prototype that’s too visually sophisticated, or has too much layout or interaction fidelity, you’ll waste valuable time (and money), time that could’ve been used on a follow-up test or another high-priority initiative.
So use these pro tips to keep you on track as you design and run your next user experience test. You’ll not only get the traditional usability data you need, but will also gather user attitudes and feelings, emotions that will equally drive the success of your website, product or service.

Interested in UX Testing?
Data Visualizations
About the Author: Collaborations

Our blog collaborators are a diverse group of professionals with extensive knowledge and experience in the field of user experience. They include UX researchers, designers, thought leaders, and industry professionals who are passionate about sharing their insights and expertise with others.
As collaborators, they contribute thoughtful and inspiring content that covers various aspects of the UX space, including emerging trends, best practices, and practical tips. Their articles are designed to help readers stay up-to-date with the latest developments in UX, as well as improve their own skills and knowledge in the field.
Read More Articles by Our Collaborators